Rules
You don’t become a Gemwielder when you hold your Gembearer for the first time, but once you learn how to use it.
– Sokras, Elder of New Linden
Click the buttons above to download the rulebook and watch the video guide or simply read on to learn everything you need to know about the rules of gemwielding.
Setting Up a Game
Setup for a game of Gemwielders is quick.
Both players start at 50 life and can never have more than that. The other resource you will need to track is power. Players start without power. To count these ressources, you can use a lifecounting card or app, dice or pen and paper.
Determine Player 1 at random as well as who plays what Gembearer. Place your Gembearers in front of you, shuffle the associated weapon cards and position them near the Gembearers faced down. These are your starting decks. Both players draw five cards from their decks.
Put all gems on a pile within reach of all players, forming the gem pool. The matching gem cards are shuffled together into one deck that is placed next to the gem pool faced down. This is the gem card deck. Place the Sources next to it face up.
Draw five cards from the draft deck and place them next to each other face up. This is the draft row. Player 2 may decide to reshuffle the gem card deck and repeat this step once.
That’s it, you are good to go!

Playing Gemwielders
Player 1 has the first turn. A turn consists of four phases: Draft phase, main phase, attack phase and draw phase.
Note: On their very first turn, Player 1 skips their attack phase.
Draft Phase
Before anything else happens, scrap all cards from the draft row that none of the players could ever be elligible to draft. (This only occurs once both players have at least three gems.)
Then, fill the empty slots in the draft row, using the gem card deck. It should now contain five cards.
Next, you may take a gem from the gem pool and place it on your Gembearer. You can’t have more than five gems on your Gembearer and once a gem is socketed, it can never be removed. Choose wisely!
You may draft or scrap one gem card from the draft row with equal or lower gem requirement than you have gems on your Gembearer. To draft, add the selected card to your discard pile. To scrap, move it to the scrap pile face up.
Lastly, you may add a Source to your discard pile.
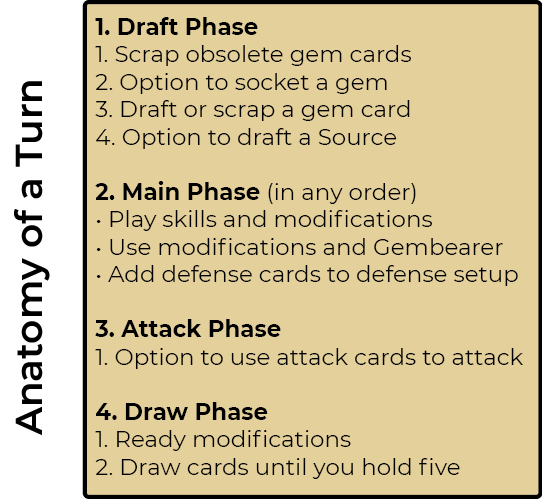
Main Phase
In the main phase, you can play skills, place and use modifications and add defense cards to your defense setup. You may do this in any order, even alternating back and forth between these actions. Tread carefully, sometimes winning or losing depends on using your cards in the optimal order.
To play a skill, put the card face up in front of you and resolve the effect as stated in the card text. Then move it to your discard pile. Many skill cards show one or more power cost symbols (lightning bolt) followed by a colon. This means you have the option to spend as much power to trigger this effect once. Should you be unable to pay the power cost or prefer not to, all other card text (if any) still apply.
If you play a Source without spending power, for example, you gain two power and move the Source to your discard pile. If you pay two power however, you still gain two power first, putting you to a net zero, but the Source is returned to the stack of Sources.
Note: When a Source is scrapped, it goes back to the stack of Sources.
To play a modification, place the card face up in the play area in front of you (unless otherwise indicated on the card). It remains there to be used or provides passive effects.
Modifications featuring the use symbol (cogwheel) can be used. To use a modification, turn it sideways to mark it used, and resolve the use effect following the colon. Some modifications will have you spend power in order to do this. The same applies to usable gembearers.
To add a defense card to your defense setup, simply place it face down in front of you. Cards are always added to the right and the order remains stable. (Perceptive players will try to track the cards in their opponent’s defense setup.)

Attack Phase
Should you decide to attack, chose any number of attack cards from your hand. Place them in front of you, add up the attack values (sword icon) and announce the attack. (e.g.: “I’m attacking you for seven.”)
The opponent’s defense setup is revealed. Add up all the cards defense values (shield icon) to determine the defender’s defense value.
Effects stated on the attack cards resolve. As the attacker, you may chose the order in which effects resolve. After that, effects stated on the defense cards resolve, starting with the leftmost (oldest) card. Other effects (e.g., the ability of the Hammer) resolve in the order the attacker determines.
After all effects have resolved, compare the attack value to the defense value. If the attack value is higher than the defense value, the attack counts as a hit. If it is equal or lower, it counts as a miss.
Hit or miss effects on attack cards resolve, then those on defense cards, and lastly those on modifications. Some of these cost power. As with skills, spending power to trigger these effects is optional and each can only be activated once per turn.
If the attack is a hit, the defender loses life equivalent to the number of points that the attack value exceeds the defense value. After the damage has been sustained, attack cards and revealed defense cards are moved to their owner’s discard piles.

Draw Phase
Ready all of your modifications and your Gembearer. (Turn them upright to mark that they will be ready for use next turn.)
Draw cards until you hold five. If at any point in the game (often now), you need to interact with your deck and there are no cards left, the discard pile is shuffled and becomes your next deck. This also happens while using cards like Intuition or Adrenaline.
Winning
If at any point during the game a player’s life drops to zero or below, they lose. Should this occur to both players simultaneously, finish the current phase. Whoever has more life at the end of the phase wins. If player’s life counts are equal, Player 2 wins.
Should both players survive until the gem card deck is empty, the game ends, and whoever has more life wins. If both player’s life counts are equal, Player 2 wins.
Glossary

Deck: This is the stack of faced down cards used to replenish your hand. In the beginning of the game, your deck consists of your shuffled weapon cards. While playing, you will add gem cards to the discard pile, which, after a few turns, becomes your new deck.
Discard: Move a card to the discard pile. If no location is specified, the card is discarded from hand. (e.g., “Defender discards 1 card at random.”) The discard pile is used to refill your deck, when it runs out of cards.
Scrap: Move a card to the scrap pile. Cards in the scrap pile are removed from the game. Note that Sources are indestructible. Therefore, when a Source is scrapped, it is returned to the stack of Sources.
Use Effect: Effect following the use symbol (cogwheel), found on modifications and Gembearers. It is triggered by paying the power cost (if any) and setting the modification or Gembearer to used (turn sideways).
Ready: In order to use a modification’s or Gembearer’s use effect, they have to be ready. Modification and Gembearers enter the game ready and are readied in the draw phase at the end of your turn or through certain card effects. Mark this by turning them upright. Note that even a ready modification may be set to ready by certain effects as can a used modification to used.
Attack and Defense Value: Values that are modified through the numbers behind the sword and shield symbol in the upper right corner of attack and defense cards and via various card effects. Used to determine if an attack is a hit or miss and how much damage is dealt.
Hit and Miss Effect: Effects following the word “Hit” or “Miss”, found on attack cards, defense cards, modifications and certain Gembearers. They are triggered when an attack is determined to be a hit or a miss. Sometimes the attacker needs to spend power to resolve the effect or to gain additional benefits.